Communicating the project, giving voices to the less represented, sharing objectives and ideas.
This module consists of learning to be able to spread stories of the inhabitants of the communities we work with and to create a common history during the process of a project working with a community. To be able to connect their stories with the community experiences and that these connections have an empowering impact on the inhabitants of the neighborhood.
The training scheme of this module consists of:
Interpersonal connection with the inhabitants of the neighborhood.
The ability to generate information in common about their own history.
Elaborate interviews that are comfortable and that will elicit the necessary information to build a common history.
Constructing discourses according to these stories that generate an intercommunal connection.
From our perspective, these stories we share will be told from a self-conscious position, as visitors to a community, and as facilitators of a communal experience of communication. To do this, we can choose a topic of conversation that is consistent with a community, something small, and we can transform it into something participatory and empowering by crafting a narrative around it that is different from the classic discourse.
Key Questions
How to communicate the intentions of the project in an appropriate and inclusive way?
How to give voice to less skilled inhabitants?
How do we collect, organise and share data, stories and memories?
Step 1: Communicating the Project
How to communicate the intentions of the project in an appropriate and inclusive way?
Communicating the intentions of a project in an appropriate and inclusive way is important to ensure that all stakeholders feel valued and included. Here are some tips on how to do it effectively:
Define the Project's Goals and Context: Clearly define the project's goals and objectives in a concise and easy-to-understand manner. Use simple language and avoid technical jargon that may be difficult for some stakeholders to understand. During this process, you can provide context by explaining the background, purpose, and significance of the project. This can help stakeholders understand why the project is important and how it fits into the larger context.
Consider the Audience: Consider the audience that you are communicating to and use language and examples that resonate with them. Use inclusive language and avoid using terminology that may be insensitive or offensive.
Use Visuals: Visual aids such as diagrams, infographics, and videos can help to illustrate the project's intentions and make the communication more engaging and understandable. Make sure that the visuals are accessible to all stakeholders, including those with disabilities.
Invite Feedback: Invite feedback from stakeholders and encourage open communication. This can help to ensure that all concerns are addressed and that the project is inclusive and responsive to the needs of all stakeholders.
Be Transparent: Be transparent about the project's intentions, timeline, and potential impact. This can help to build trust with stakeholders and ensure that they feel included in the project.
By using these tips, you can ensure that all stakeholders are engaged and supportive.
Exercise: Common Glossary
“Definitions are vital starting points for the imagination. What we cannot imagine cannot come into being. A good definition marks our starting point and lets us know where we want to end up”. - bell hooks (All About Love, 18)
We all carry definitions with us and not always consciously. Descriptions can be a good start to align and contrast different understandings on what it is at stake. The exercise of creating a common glossary can help us to align our language and to start to develop procedures on how we work together. It is a first glimpse on how we negotiate meaning, consensus and dissent.
A common glossary can be a very useful exercise in order:
to agree on the meaning of certain terms among the people creating the glossary in order to avoid misunderstandings and inconsistencies in their use.
to disambiguate about possible different uses of same words in specific contexts
to clarify the "jargon" employed in a project, and to translate more expert/disciplinary terminologies in common language accessible to general public.
There is not a single recipe to develop a common glossary. The process will vary according to the people involved or the aim. Important is that the participants developing the glossary suggest the terms and assume the responsibility to propose definitions and give feedback.
Step 2: Listening to the Voice of the Community
How to give voice to less skilled inhabitants?
The best way to give voice to the people involved in the different members of the neighborhood, is to take time to listen to their testimonies and agree with them on the subjects they want to highlight in order to spread their stories, wishes and concerns. We can use the interview as the main element to gather and work on this story-telling crafting.
Interviews can be an important tool for spreading the voice of a community because they allow community members to share their stories, experiences, and perspectives in their own words. By giving community members a platform to share their voices, interviews can help to elevate the voices of those who may not have traditionally had access to positions of power or influence.
They can also be a powerful tool for building relationships between community members and those who are working on projects or initiatives within the community. By listening to and understanding the perspectives of community members, those working on projects or initiatives can develop a deeper appreciation for the community's needs, goals, and priorities, and can better tailor their work to address those needs and priorities.
In addition, interviews can be used to gather data and insights that can inform decision-making and guide the development of projects or initiatives. By gathering data through interviews, those working on projects or initiatives can ensure that their work is responsive to the needs and perspectives of the community and can be more effective as a result.
Overall, interviews can be an important tool for building trust, gathering insights, and elevating the voices of community members, all of which can help to ensure that projects and initiatives are more effective and responsive to the needs and priorities of the community.
In order to plan an interview we can follow some previous key steps by the participants of the project:
Determine the Purpose: Start by determining the purpose of the interview. Are you looking to learn more about the community's relationship to the urban environment? Are you looking for stories or experiences related to a specific location or area? Having a clear purpose will help you tailor your questions and guide the conversation.
Identify Participants: Identify the participants you want to interview. This may include people who have lived in the area for a long time, stakeholders, or other individuals who can provide insight into the history of the neighborhood, the uses of public space resources in the present or the purpose of the public space in the future. The common history of what is about to be represented will be a collection of the different testimonies that we have listened to.
Develop Questions: Develop a set of questions that are tailored to the purpose of the interview and the participants you have identified. Questions should be open-ended and encourage participants to share their stories, experiences, and perspectives. Some potential questions may include:
How do you interact with the urban environment in this area?
Can you share a story or experience related to a specific location in the area?
What do you think makes this area unique or interesting?
How do you see the area changing over time?
Schedule the interview: Contact the participants to schedule the interview. Be sure to provide information about the purpose of the interview, the expected duration, and any other details they need to know.
Prepare for the interview: Review the questions you have developed and prepare any necessary materials, such as a recording device. It is also a good idea to do some previous encounters with the participants and talk about the topic to help guide the conversation.
In this training scheme we provide an interviewing exercise that is specifically oriented to urban exploration and that can be useful to energize the conversation:
Exercise: Walking Stories: The fringes of the city
Different perspectives are crucial to understand a territory, whether the one we know by heart and could walk with our eyes bended, or those which are completely new to us. We need to pay attention to the stories that explain and deepen into the reasons why a neighborhood is like it is.
Knowledge stemming from daily life, memory of special collective and individual moments in the urban space, transformation of the landscape, ways of living that vanished, others that appeared in the way, hopes and desires for the collective future… Testimonies that are only reachable through dialogue with the main characters of those stories. The main goal of this exercise is getting to know a diversity of experience to understand and deepen into a multilayered story of the neighborhood.
Before the walk:
Inform your interviewee about the purpose of the conversation, which is to record their thoughts and stories about the neighborhood while walking through it. Let them know that the conversation will be recorded and made available for others to listen to.
Set the time and place for the walk, and agree on a starting point and an endpoint. The walk should take about 45 minutes, and the audio recording should not be longer than 25 minutes.
Advise the interviewee that you will be using an audio recording device, such as a phone, voice recorder, or microphone, and that you may also use GPS to track the route.
Try out the recording equipment beforehand to ensure that the audio will be clear and free of interference.
Aim to interview a diverse selection of people from different backgrounds, ages, and genders, who are familiar with the neighborhood.
During the walk:
Start walking and chatting with your interviewee, gradually giving them more space to talk as the conversation progresses.
Look for three types of conversed content: descriptions of the neighborhood, personal and community stories about the neighborhood, and reflections on the neighborhood and its future.
Be prepared with some questions beforehand, but also be open to new topics and observations that may come up during the conversation.
Stop at specific moments to observe and take note of relevant points of interest in the neighborhood.
After the walk:
Use a sound editing software such as Anchor or Audacity to edit the audio recording, removing any irrelevant or redundant content and silences.
Mark the itinerary of the walk on a map to show the route taken.
Publish the itinerary and audio recording together so that others can experience the visit to the neighborhood by listening to the interviewee. This can be done through a Telegram channel, a community atlas, or other means.
Tool: Tips for conducting interviews with the community
Questions addressed:
Build Trust: Building trust is crucial when conducting interviews as it helps participants feel more comfortable sharing their stories. Before conducting interviews, take the time to build rapport with the participants and explain the purpose of the storytelling exercise.
Active Listening: Active listening is a vital skill when conducting interviews. It involves listening to what the participants are saying, acknowledging their feelings, and asking follow-up questions to clarify and deepen their stories.
Ask Open-Ended Questions: Ask open-ended questions that allow participants to tell their stories in their own words. Avoid asking leading questions or questions that may have a yes or no answer.
Record the Interviews: Recording the interviews can be helpful to capture the nuances and details of the stories. However, make sure to get the participants' consent before recording and explain how the recordings will be used.
Follow-Up: Follow up with participants after the interview to thank them for sharing their stories and to keep them updated on the progress of the storytelling exercise. This can help build stronger relationships with the community and show that their participation is valued.
Step 3: Creating a Narrative
How do we collect, organize and share data, stories and memories?
During the collaboration with the different stakeholders, we can decide on the pieces of information that we will highlight and we will together create a common discourse on the topics we want to address together. Here are some steps to consider:
Collect and Transcribe: First, transcribe the interviews to have a written record of what was discussed. This can be done by typing up the transcripts or using voice-to-text software. It's important to ensure that all data is collected in a secure and confidential manner, and that participants have given their informed consent for their data to be used.
Code and Categorize: Once the interviews are transcribed, review the data and identify key themes and topics that emerged during the interviews. This may involve coding the data by assigning labels to specific passages or quotes that relate to particular topics or themes. Categorize these themes into groups to make them easier to analyze.
Analyze and Synthesize: Once the data is coded and categorized, analyze the data to identify key insights and findings. This may involve synthesizing the data from multiple interviews to identify patterns or trends.
Share the Findings: Share the findings with others involved in the project or initiative, and with the wider community. This may involve creating reports, presentations, or other materials that highlight the key insights and stories that emerged from the interviews. It's important to ensure that any sharing of data or stories is done with the consent of the participants, and that their privacy and confidentiality is respected.
Here we provide an exercise to conduct this process, that can be used among the organizations, the participants, and inviting people involved directly in the process, such as community members or interviewees:
In order to create a narrative more freely and explore different kind of stories as results, here there is a list of narrative structures that can be used as an inspiration:
After this module, you can use some co-creation techniques in order to have an artistic result realized by the members of the community and share it in an event or assembly.
Exercise: Feelings Chart: Good news and bad news.
As we had a more experiential and experimental Narratives Module in the Palermo Training, we have decided to add the following exercise to complement the Training Scheme online, answering to one of the main questions: How do organise and share data, stories and memories?
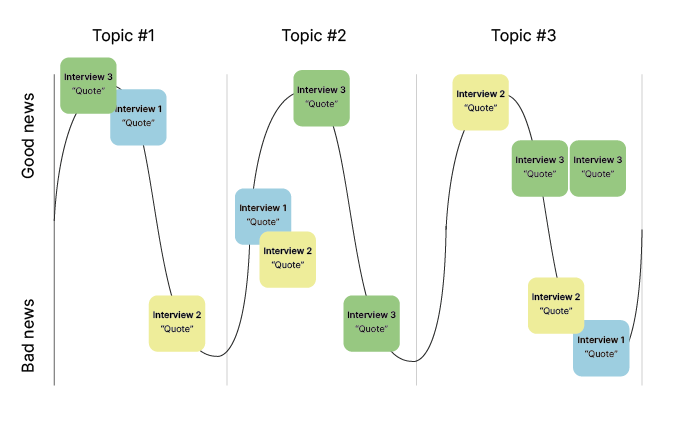
While creating a narrative, there is a simple and participatory way to locate the elements we want to talk about in a “Feelings Chart”, using a white board or a continous paper, post-its and markers.
We will divide our story in the different topics we have been asking about during the interviews, and develop a curve that sets the mood, divided in “good news” and “bad news”, having in mind all the spaces in between, in relation with each topic we want to adress. This will be our Feelings Chart, where we can connect the testimonies of people with a discourse that, eventually, will be public discourse.
This chart is inspired by the lecture by Kurt Vonnegut: ‘Shape of Stories’. Kurt Vonnegut, Shape of Stories (subtitulos castellano)
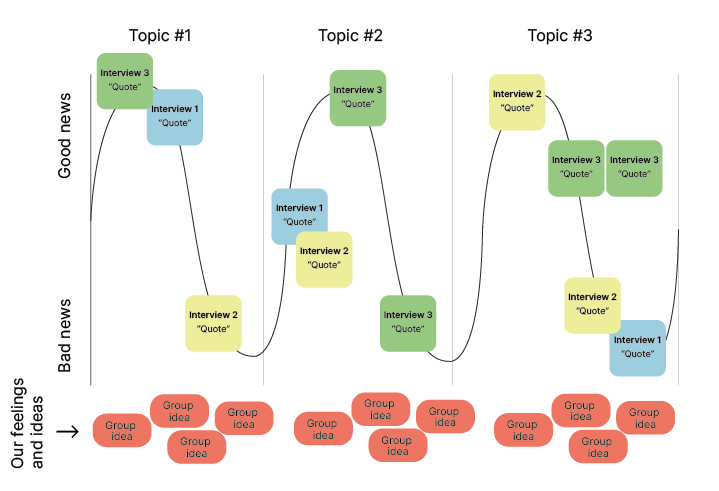
Then we will locate in the graphic the most significant parts of their testimonies in our story, using post-its with different colors representing each of the persons interviewed, and any additional information related to the quotes selected previously. This will allow us to have a general view of the amount of people involved, the balance in representation, and the balance between bad news and good news:
During this participatory process, the group will have a discussion on their feelings connected to the answers in the interview, and why they have selected those fragments as relevant, and why they think they are good news or bad news. This will also be noted and connected to the different topics that will be addressed, setting a “situated voice”: An honest perception of the group about their experience while portraying the neighborhood and the people that they have interacted with:
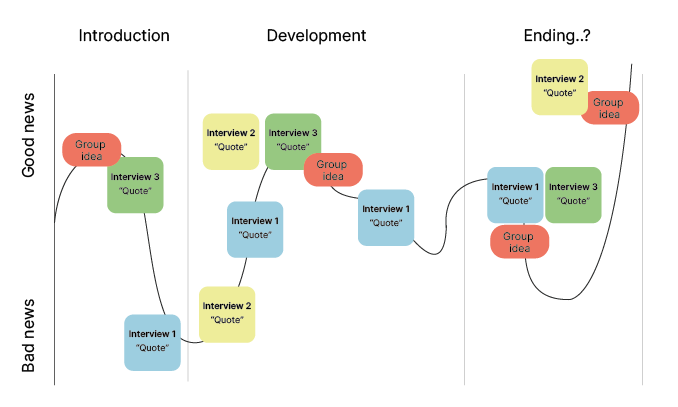
After this discussion, we will be able to set up a narrative arch, divided in different “chapters”, in which we will decide if the mood of the portrait will be plain, will lead to a feeling of hope, will focus on a struggle perspective… or anything you can imagine. We can also use the Narrative’s Structures list in order to imagine new narrative experiences.
With this guideline of the spectator’s experience, we will fill the narrative with the testimonies selected and our feelings and ideas that can connect them, and the narrative resources that will be needed to set that mood (music, soundscape…):
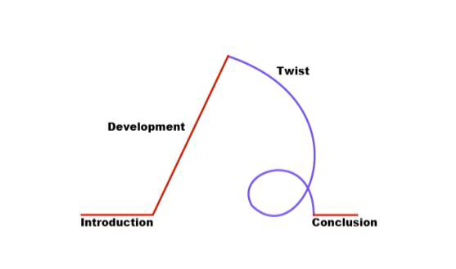
Tool: List of narrative structures
In order to spread their story, we can focus on the main questions involved:
What is the story we want to tell?
What is the story the inhabitants want to tell?
For whom is this story?
What are the feelings linked to the story told?
The narrative structure can vary in very different ways, relating with what elements we are going to highlight, and the elements that are crucial to tell our story. That’s why drawing in a simple line the narrative structure of our story can help us visualize the different feelings that will guide the experience. Here there’s a list of narrative’s structures that can be useful to follow or an inspiration to design new ones.